Showing posts with label WordPress. Show all posts

Thursday, 13 July 2017

Top 6 Essential WordPress Plugins for Solopreneurs


Top 6 Essential WordPress Plugins for Solopreneurs


1. Tawk.to

Offering live chat as a solopreneur isn’t easy. Yet with the Tawk.to pluginyou can get it done. Tawk.to is a free messaging app that lets you chat with your website visitors.
Each page you designate on your website will get a handy chat window in the bottom right corner that you can fully customize to your needs. Once your visitor clicks on the chat window, they are prompted to enter their name and email to start chatting.

2. Sumo

Sumo is like the swiss army knife of marketing. It is the ideal choice for a one-person marketing operation with little to no technical skills.
Downloading Sumo for your WordPress site gives access to a huge suite of tools that give your website a professional touch, helping you get more conversions.

3. MailChimp for WordPress

For solopreneurs, automation is everything. Any task you can get off your plate lets you focus even more time on acquiring and supporting your customers. MailChimp gives you that added automation your business needs through interactive email chains. When a customer signs up to your newsletter or requests a quote, you can set MailChimp to automatically email them with a welcome message or prompt them with a message requesting more information for that quote. This process gives the illusion of a personal touch and can move your potential customer along the sales process without you ever lifting a finger.
The MailChimp for WordPress plugin connects your WordPress website with your MailChimp account giving you the flexibility to add mobile responsive signup and opt-in methods to your website manipulating any code.

4. Beaver Builder

Solopreneurs wear many hats, and too often one of those hats isn’t programmer or website designer. Luckily, for those of us who weren’t blessed with extensive development knowledge, Beaver Builder can be our champion.

5. Broken Link Checker

Arguably not the coolest or sexiest of the six plugins here, but no less important. As a solopreneur you likely don’t have the time or resources to apply a relentless attention to detail when it comes to your business and website. Unless you’re outsourcing website maintenance, you likely have a few grammar issues (for that we recommend Grammarly) and a handful of broken links with it. This is where Broken Link Checker becomes your savior.

6. IFTTT

IFTTT stands for “If This Then That” and allows you to create powerful triggers and actions that will automate certain workflows from your WordPress site. The IFTTT Bridge for WordPress plugin allows you to display any processed data from your IFTTT automation directly on your WordPress site. Or alternatively, you can connect your WordPress site with your IFTTT account and create automation with hundred of applets.
As a solopreneur, IFTTT takes typically routine and mundane tasks off your plate and assigns them triggers which prompt a workflow with an end result you desire. Here are just a handful of applets you could use to free up time and make your site more powerful:

7 Setup Tips You Must Know for WordPress Beginners

Welcome to WordPress! Starting your first WordPress powered blog or website is an exciting, and sometimes confusing, time. You are likely worried about making mistakes and also wanting to get up and running as soon as possible. The intention of this article is to do just that. We aim to cut straight to the core of what you’ll need to build a safe and secure site that is custom fit to your needs, and is easy to manage.

7 Setup Tips You Must Know for WordPress Beginners

7 Setup Tips You Must Know for WordPress Beginners


1. Picking and Learning Your Theme

Picking a theme can be daunting, especially considering there are hundreds of thousands of themes to choose from. The good news for any WordPress beginner is there are a handful of tried and true WordPress themes that are extremely popular and customizable. Divi and Genesis are great options for beginners. They are user-friendly meaning they don’t require in-depth developer skills, they are affordable, and they have a large community to draw support from.
Beyond choosing the right theme comes learning how it works, and how you can customize it to your individual needs. This is accomplished in two ways:

2. Protect Your Hard Work By Backing Up Your WordPress Site

Being new to WordPress means you’ve likely never seen the white screen of death or have fallen victim to a malicious hacker who has locked you out of your site. Regularly backing up your WordPress site will ensure you can get back up and running when the day comes that you lose access, or your site breaks from some faulty plugin.
There are three ways you can backup your WordPress site:
  1. Carefully choose a WordPress hosting provider that offers backup services. Our partner, SiteGround, for example, has an auto-backup system which makes a copy of your site daily. They provide you with the flexibility to restore your data with just a few clicks.
  2. Back it up yourself using an FTP server and manually transfer the files between your server and your computer on a regular basis.
  3. Download a backup plugin like UpdraftPlus or BackupBuddy.
  4. 3. Make Your Site Search Engine Friendly

    With any WordPress site, your goal is likely to get more traffic, more readers, or more customers. One of the best ways to do that is through optimizing your site to rank higher on Google or other search engines. This tactic is called Search Engine Optimization (SEO). While WordPress does a good job out of the box with SEO, these two tips will put you far ahead of your competition with a minimal time investment:
    Download an SEO plugin
    While there are hundreds of SEO plugins, by far the most popular plugin is Yoast. Many other web-based tools like SEMrush and Moz will become familiar to you as your site grows, but for any WordPress beginner, Yoast is a great start because it is an all-in-one solution that has a clear and easy-to-use interface. To download a WordPress SEO plugin from the admin interface:
    Plugins > Add New > Search for ‘SEO’ > Click Install Now
  5. Adjust your permalink settings
    According to Yoast, a straightforward permalink structure is ideal for SEO. To take it up a notch add your main keyword somewhere in your post’s name. Adjusting your permalink structure in WordPress is simple:
    Go to Settings > Permalinks > Select ‘Post Name’
  6. 4. Beef Up Your Security

    Strong security for your WordPress site doesn’t need to be expensive or take a long time to set up. These three steps will get you there in no time:
    Generate a strong password
    Your new WordPress site likely gave you a username and password and should be updated as soon as possible to thwart any hackers from using brute force attacks to gain control of your website. Generating a secure password involves using a differentpassword than any of your other logins and using a long string of multiple numbers, letters, and symbols. If you want a secure password quickly, you can always use a password generator to do the job for you.
    Update your site regularly
    Update WordPress, your plugins, and your themes regularly to close any backdoors and vulnerabilities left open to hackers. Looking at the graphic below you can see that WordPress notifies you when any updates are available and makes updating as simple as clicking ‘Update’.
  7. Install a security plugin
    Much like your computer likely has some sort of antivirus or anti malware software built in, your website will need some similar defense systems. By far the most popular is Wordfence and All In One WP Security and Firewall. Both are free and robust security solutions. They have paid versions as well for more premium protection. To learn more about WordPress security check out WPBeginner’s Step By Step Guide.
  8. 5. Be Mindful About Must-Have Plugins

    When you’re just getting started with WordPress, you are likely doing lots of research into best practices and troubleshooting some problems you may be having. Which is great, you should absolutely be doing that. Along the way, it is almost inevitable that you will come across some article about “Must Have WordPress Plugins”. While these articles may have great intentions, you should know that more plugins aren’t always better. In fact, the opposite is usually true. You should keep your plugins to a bare minimum to run your site and provide the user experience you desire. More plugins than necessary can slow down your site tremendously. Another issue with more plugins is they come with added vulnerabilities. Any plugin that isn’t up to date has the potential to be hacked or even become faulty. Only download high-quality plugins from trusted sources who update frequently.

    6. Gain Insights About Your WordPress Site With Analytics

    WordPress is strong in a lot of areas but built in analytics and dashboards is not one of them. Luckily there are many plugins available that make it easy to track important things like where your traffic is coming from, how often people are first-time 
  9. 7. Encourage Communication

    With any online presence, you will eventually have readers, followers, and customers reach out for a multitude of reasons. They have questions about your product, they want to praise you for an article that impacted them, they want to work for you, and much more. With that, you’ll need some easy ways for them to reach out.
  10. Give them multiple options
    While it is great to give your customers and readers ways to contact you, it can also be difficult to weed out the spammers. If you’re wary about signing up for costly services or giving out personal phone numbers and email in the beginning you can use services like Google Voice and Google Suite. Google Voice gives you a free phone number that routes to your cell phone and Google Suite provides you with a custom email address for only $5 per user a month.
    Finally, a great option for online chat is the free Tawk.To plugin which lets your users chat with you and your team live from the website. The messages can even be sent to your mobile phone for added convenience.

Wednesday, 19 October 2016

How To Protect WordPress Website From Hackers | 12 Most Useful .htaccess Tricks for WordPress To Protect From Hackers

Best WordPress Tutorials

 12 Most Useful .htaccess Tricks for WordPress To Protect From Hackers

 How To Protect WordPress Website From Hackers 

12 Most Useful .htaccess Tricks for WordPress Ever new User Must Do To Protect From Hackers

WordPress tutorials allow you to extend the power of WordPress. Our step by step WordPress tutorials are easy to understand and follows the WordPress best practices. Don't waste your time buying books that cover just the basics. These WordPress tutorials contain real-life examples, tips, and hacks that allows you to learn WordPress faster.

12 Most Useful .htaccess Tricks for WordPress

What is .htaccess File and How to Edit it?

The .htaccess file is a server configuration file. It allows you to define rules for your server to follow for your website.
WordPress uses .htaccess file to generate SEO friendly URL structure. However, this file can do a lot more.
The .htaccess file is located in your WordPress site’s root folder. You will need to connect to your website using an FTP client to edit it.

Before editing your .htaccess file, it is important to download a copy of it to your computer as backup. You can use that file in case anything goes wrong.
Having said that, let’s take a look at some useful .htaccess tricks for WordPress that you can try.

1. Protect Your WordPress Admin Area

You can use .htaccess to protect your WordPress admin area by limiting the access to selected IP addresses only. Simply copy and paste this code into your .htaccess file:
view source
print?
01AuthUserFile /dev/null
02AuthGroupFile /dev/null
03AuthName "WordPress Admin Access Control"
04AuthType Basic
05<LIMIT GET>
06order deny,allow
07deny from all
08# whitelist Syed's IP address
09allow from xx.xx.xx.xxx
10# whitelist David's IP address
11allow from xx.xx.xx.xxx
12</LIMIT>
Don’t forget to replace xx values with your own IP address. If you use more than one IP address to access the internet, then make sure you add them as well.
For detailed instructions, see our guide on how to limit access to WordPress admin using .htaccess.

2. Password Protect WordPress Admin Folder

Password Protect WordPress Admin Folder


If you access your WordPress site from multiple locations including public internet spots, then limiting access to specific IP addresses may not work for you.
You can use .htaccess file to add an additional password protection to your WordPress admin area.
First, you need to generate a .htpasswds file. You can easily create one by using this online generator.
Upload this .htpasswds file outside your publicly accessible web directory or /public_html/ folder. A good path would be:
/home/user/.htpasswds/public_html/wp-admin/passwd/
Next, create a .htaccess file and upload it in /wp-admin/ directory and then add the following codes in there:
view source
print?
01AuthName "Admins Only"
02AuthUserFile /home/yourdirectory/.htpasswds/public_html/wp-admin/passwd
03AuthGroupFile /dev/null
04AuthType basic
05require user putyourusernamehere
06<Files admin-ajax.php>
07Order allow,deny
08Allow from all
09Satisfy any
10</Files>
Important: Don’t forget to replace AuthUserFile path with the file path of your .htpasswds file and add your own username.
For detailed instructions, see our guide on how to password protect WordPress admin folder.

3. Disable Directory Browsing
Disable Directory Browsing in wordprss


Many WordPress security experts recommend disabling directory browsing. With directory browsing enabled, hackers can look into your site’s directory and file structure to find a vulnerable file.
To disable directory browsing on your website, you need to add the following line to your .htaccess file.
view source
print?
1Options -Indexes
For more on this topic, see our guide on how to disable directory browsing in WordPress.

4. Disable PHP Execution in Some WordPress Directories

Sometimes hackers break into a WordPress site and install a backdoor. These backdoor files are often disguised as core WordPress files and are placed in /wp-includes/ or /wp-content/uploads/ folders.
An easier way to improve your WordPress security is by disabling PHP execution for some WordPress directories.
You will need to create a blank .htaccess file on your computer and then paste the following code inside it.
view source
print?
1<Files *.php>
2deny from all
3</Files>
Save the file and then upload it to your /wp-content/uploads/ and /wp-includes/ directories. For more information check out our tutorial on how to disable PHP execution in certain WordPress directories.

5. Protect Your WordPress Configuration wp-config.php File

Probably the most important file in your WordPress website’s root directory is wp-config.php file. It contains information about your WordPress database and how to connect to it.
To protect your wp-config.php file from unathorized access, simply add this code to your .htaccess file:
view source
print?
1<files wp-config.php>
2order allow,deny
3deny from all
4</files>

6. Setting up 301 Redirects Through .htaccess File

Using 301 redirects is the most SEO friendly way to tell your users that a content has moved to a new location. If you want to properly manage your 301 redirects on posts per post basis, then check out our guide on how to setup redirects in WordPress.
On the other hand, if you want to quickly setup redirects, then all you need to do is paste this code in your .htaccess file.
view source
print?
1Redirect 301 /oldurl/ http://www.example.com/newurl
2Redirect 301 /category/television/ http://www.example.com/category/tv/

7. Ban Suspicious IP Addresses

Are you seeing unusually high requests to your website from a specific IP address? You can easily block those requests by blocking the IP address in your .htaccess file.
Add the following code to your .htaccess file:
view source
print?
1<Limit GET POST>
2order allow,deny
3deny from xxx.xxx.xx.x
4allow from all
5</Limit>
Don’t forget to replace xx with the IP address you want to block.

8. Disable Image Hotlinking in WordPress Using .htaccess

Other websites directly hotlinking images from your site can make your WordPress site slow and exceed your bandwidth limit. This isn’t a big issue for most smaller websites. However, if you run a popular website or a website with lots of photos, then this could become a serious concern.
You can prevent image hotlinking by adding this code to your .htaccess file:
view source
print?
1#disable hotlinking of images with forbidden or custom image option
2RewriteEngine on
3RewriteCond %{HTTP_REFERER} !^$
4RewriteCond %{HTTP_REFERER} !^http(s)?://(www\.)?wpbeginner.com [NC]
5RewriteCond %{HTTP_REFERER} !^http(s)?://(www\.)?google.com [NC]
6RewriteRule \.(jpg|jpeg|png|gif)$ – [NC,F,L]
This code only allows images to be displayed if the request is originating from wpbeginner.com or Google.com. Don’t forget to replace wpbeginner.com with your own domain name.
For more ways to protect your images see our guide on ways to prevent image theft in WordPress.

9. Protect .htaccess From Unauthorized Access

As you have seen that there are so many things that can be done using the .htaccess file. Due to the power and control it has on your web server, it is important to protect it from unauthorized access by hackers. Simply add following code to your .htaccess file:
view source
print?
1<files ~ "^.*\.([Hh][Tt][Aa])">
2order allow,deny
3deny from all
4satisfy all
5</files>

10. Increase File Upload Size in WordPress

There are different ways to increase the file upload size limit in WordPress. However, for users on shared hosting some of these methods do not work.
One of the methods that has worked for many users is by adding following code to their .htaccess file:
view source
print?
1php_value upload_max_filesize 64M
2php_value post_max_size 64M
3php_value max_execution_time 300
4php_value max_input_time 300
This code simply tells your web server to use these values to increase file upload size as well as maximum execution time in WordPress.

11. Disable Access to XML-RPC File Using .htaccess

Each WordPress install comes with a file called xmlrpc.php. This file allows third-party apps to connect to your WordPress site. Most WordPress security experts advise that if you are not using any third party apps, then you should disable this feature.
There are multiple ways to do that, one of them is by adding the following code to your .htaccess file:
view source
print?
1# Block WordPress xmlrpc.php requests
2<Files xmlrpc.php>
3order deny,allow
4deny from all
5</Files>
For more information, see our guide on how to disable XML-RPC in WordPress.

12. Blocking Author Scans in WordPress

A common technique used in brute force attacks is to run author scans on a WordPress site and then attempt to crack passwords for those usernames.
You can block such scans by adding the following code to your .htaccess file:
view source
print?
1# BEGIN block author scans
2RewriteEngine On
3RewriteBase /
4RewriteCond %{QUERY_STRING} (author=\d+) [NC]
5RewriteRule .* - [F]
6# END block author scans
For more information, see our article on how to discourage brute force attacks by blocking author scans in WordPress.
We hope this article helped you learn the most useful .htaccess tricks for WordPress. You may also want to see our ultimate step by step WordPress security guide for beginners.
Sunday, 27 March 2016

How to Switch from Blogger to WordPress without Losing Google Rankings


Blogger is an awesome free tool to quickly start blogging. However, many Blogger users eventually realize that if they want full control of their blog, then they would be better off with their own self hosted WordPress.org blog (what’s the
 difference between self-hosted WordPress.org vs WordPress.com blogs). In this step by step tutorial, we will help you switch from Blogger to WordPress without losing Google rankings.


Step 0. Before You Start


To get started with WordPress, the first thing you would need is a good WordPress hosting company and your own domain name.


Once you have signed up for WordPress hosting and set up your domain name, the next step is to install WordPress on your hosting account. We have a step by step tutorial on how to install WordPress. Once you have installed WordPress, it is time to move your content from Blogger to WordPress.

Step 1. Export Your Blogger Blog


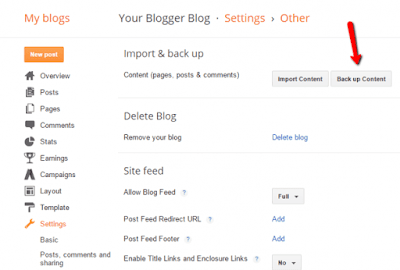
First thing you need to do is export your blogger blog’s content. Simply log into your blogger dashboard and go to Settings » Other page. Under the blog tools, click on the Export Blog link.

Export Your Blogger Blog


This will bring up a popup where you need to click on the Download Blog button.


Your Blogger blog’s content will be downloaded to your computer in an XML file.

Once the download is complete, it is time to import it into your WordPress site.

Step 2. Import Blogger to WordPress


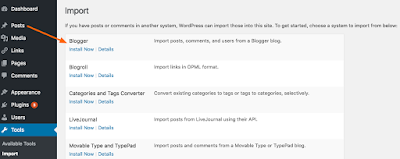
To start importing your Blogger site into WordPress, you need to go to your WordPress admin and visit Tools » Import. On the Import page, click on Blogger.
Import Blogger to WordPress

Import Blogger to WordPress


This will bring up a popup asking you to install the Blogger to WordPress importer. You need to click on the Insall button.

WordPress will now download and install the Blogger Importer plugin for you. Once it is finished installing, you would need to click on the Activate Plugin and Run Importer link to continue.


On the Import Blogger screen, WordPress will ask you to upload the XML file. This is the file that you downloaded in Step 1.

Simply click on the choose file button and upload the XML file you downloaded earlier. Next, click on the Upload file and import button to continue.


Now if you didn’t select one of our recommended hosts or your site is really large, you may get an error that your file size is too large. In this case, you would need toincrease your maximum file upload limit. If your file is small, then you won’t see any errors.

WordPress will now import your blogger posts one by one. When it is finished, you will be asked to assign an author to the imported posts. You can assign your blogger posts to an existing author (you) or create a new author account.

Congratulations! you have successfully imported your Blogger content into WordPress. However, you still need to make sure that you don’t loose any search rankings and that visitors from your old blog easily land to the same content on your new WordPress website.

Step 3. Setting up Permalinks


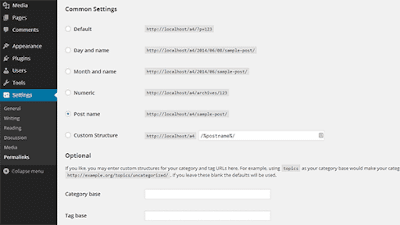
Permalinks is the term used for URL structure of individual pages. WordPress comes with a feature that allows you to set up SEO friendly URL structure. However, since you are importing content from Blogger, you would want your URL structure to be as close to your Blogger URL structure as possible.
Setting up Permalinks

Setting up Permalinks


To set permalinks, you need to go to Settings » Permalinks screen and choose Month and Name as your permalink structure.


Step 4. Setting up Redirection


The most important step in moving any website is to set up proper redirection so that users are redirected to your new website.

The important part of redirection is that you want users to land on exactly the same page on the new site which they were trying to access on the old site. Secondly, this also notifies search engines that your old site is moved to a new location.

To successfully move from Blogger to WordPress, you need to set up redirection on two levels.
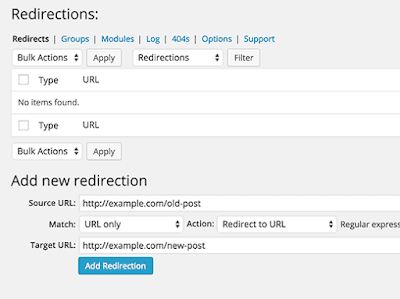
Setting up Redirection

Setting up Redirection


First, you will redirect Blogger visitors to your new WordPress blog. Second, once users reach your WordPress site, you will redirect them to the exact post they were trying to read.

Let’s first set up redirection on the blogger blog. You need to log on to your Blogger account and go to your Blog’s settings and click on Template.


On the template page, you need to scroll down to the bottom of the page and click on Revert to Classic Template link.


After switching to classic template, you will see ‘Edit Template HTML’ textarea. You need to replace everything in this text area with the following code. Make sure that you replace http://www.example.com with your own domain name.


01<html>


02 <head>


03  <title><$BlogPageTitle$></title>


04


05   <script>


06    <MainOrArchivePage>


07    window.location.href="http://example.com/"


08    </MainOrArchivePage>


09    <Blogger>


10     <ItemPage>


11     window.location.href="http://example.com/?blogger=<$BlogItemPermalinkURL$>"


12     </ItemPage>


13    </Blogger>


14   </script>


15


16   <MainPage>


17   <link rel="canonical" href="http://example.com/" />


18   </MainPage>


19


20   <Blogger>


21    <ItemPage>


22    <link rel="canonical" href="http://example.com/?blogger=<$BlogItemPermalinkURL$>" />


23    </ItemPage>


24   </Blogger>


25 </head>


26


27 <body>


28  <MainOrArchivePage>


29   <h1><a href="http://example.com/"><$BlogTitle$></a></h1>


30  </MainOrArchivePage>


31  <Blogger>


32   <ItemPage>


33    <h1><a href="http://example.com/?blogger=<$BlogItemPermalinkURL$>"><$BlogItemTitle$></a></h1>


34    <$BlogItemBody$>


35   </ItemPage>


36  </Blogger>


37 </body>


38</html>


Save your template, and you have successfully implemented redirection on your Blogger blog.

However, you still need to setup redirection on your WordPress site so that users are redirected to the proper posts.

You need to copy and paste the following code in your WordPress theme’sfunctions.php file or in a site-specific plugin.

If this is your first time adding code to your WordPress site, then you may want to check our beginner’s guide to pasting snippets from the web into WordPress.


01function blogger_query_vars_filter( $vars ) {


02  $vars[] = "blogger";


03  return $vars;


04}


05


06add_filter('query_vars''blogger_query_vars_filter');


07


08function blogger_template_redirect() {


09  global $wp_query;


10  $blogger $wp_query->query_vars['blogger'];


11  if ( isset ( $blogger ) ) {


12    wp_redirect( get_wordpress_url ( $blogger ) , 301 );


13    exit;


14  }


15}


16


17add_action( 'template_redirect''blogger_template_redirect' );


18


19function get_wordpress_url($blogger) {


20  if ( preg_match('@^(?:https?://)?([^/]+)(.*)@i'$blogger,$url_parts) ) {


21    $query new WP_Query (


22      array "meta_key" => "blogger_permalink""meta_value"=> $url_parts[2] ) );


23    if ($query->have_posts()) {


24      $query->the_post();


25      $url = get_permalink();


26    }


27    wp_reset_postdata();


28  }


29  return $url $url : home_url();


30}


The code above creates a blogger to WordPress 301 redirect which is what you need to ensure best SEO.

Once you have pasted this code, that’s all you need to do for setting up redirection.

Now anyone visiting a post on your old Blogger blog will be redirected to the same post on your new WordPress site.

Step 5. Redirect Feeds


Your RSS subscribers on the old Blogger site will not be able to notice the switch. That’s why you will need to redirect your Blogger feed to your new WordPress site’s feed.

You can do this by logging in to your Blogger account and then visit Settings » Other page under your blog dashboard.

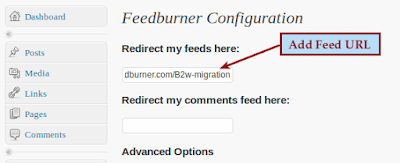
Under the Site Feed section, click on Add link next to Post Feed Redirect URL. Here you can enter your new WordPress site’s feed address.

Usually it is http://your-awesome-site.com/feed/ (don’t forget to replace your-awesome-site with your own domain name).
Redirect Feeds

Redirect Feeds


Step 6. Import Images From Blogger to WordPress Media Library


When you are transferring blogger to WordPress, the WordPress importer will download images from your blogger posts into the WordPress media library. However, it can fail to download some images. This doesn’t happen often, but it can happen.

But there’s nothing to worry about because you can find and import these images into WordPress. Follow the instructions in our how to import external images in WordPress tutorial.

This will import all images from your blogger into your WordPress Media Library. Once the images are in your WordPress media library, you can easily create image galleries and more.

We hope this tutorial helped you switch from Blogger to WordPress without losing Google rankings. We would like to welcome you to the WordPress community. To get started with WordPress, please take a look at our beginner’s guide section and our WordPress beginner videos.

If you have a friend still using Blogger, then you can show them our comparison on WordPress vs Blogger and convince them to switch over.